
How To Build A Faux DIY Corner Fireplace

When we began our basement renovation, we realized that our Basement Media Room would require a source of heat — basements can become very chilly in the winter! And what’s more beautiful than a fireplace? We determined early on that we would find out how to create a false fireplace for this space. Why should you go for an electric fireplace? And why make a do-it-yourself corner fireplace?
We thought about getting a ventless gas fireeplace insert installed. They can be so lovely and instantly warm with the press of a button. This design didn’t endure long because of the cost, but the primary issue was the venting for the gas unit. Don’t know where to go for chimney repair? Chimney Repair Long Island is the best option for you.
Read More About: besteducationweb
The walls where we required the fireplace to go are beneath our large front porch. This is not an ideal location for a heat vent! The only wall with venting potential was also the only wall with a window (remember how we made the basement window seem bigger by using an old bifold? If you haven’t seen it yet, you should! So, we were left with an electric fireplace. We knew we wanted to make our own mantle and fireplace surround. Because we love to construct things, but also because we could completely adapt them to our oddly shaped room.
Click Here: TechnologyIdea
A fireplace in the corner? What on earth were you thinking!?
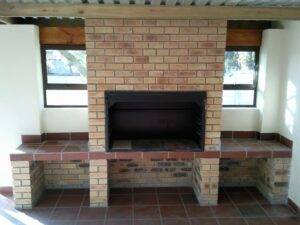
We placed the fireplace in the corner, as shown in the photo above. That was not my intention at all! Our initial intention was to DIY a fireplace into the center of our built-in entertainment center. But as I began to live with the concept in my head, I grew less and less fond of it. It seemed like there would be just too much going on in one little space, not giving the TV or the fireplace element credit. (Especially given how wonderfully our concealed TV cabinet worked out!) That baby deserves to shine!)
We hauled the fireplace unit into the corner while working one day. And then I had a major lightbulb moment. We hadn’t planned anything special for this little nook, which can be seen from the media room (obviously) and our eventual Hobby Room Pub. But I was still a little hesitant. I had an uninformed prejudice towards corner fireplaces. I thought they looked strange – I was completely incorrect!
But how can you make a DIY corner fireplace appear nice?
I discovered what makes a corner fireplace appear best after reading through Pinterest for corner fireplace designs. The awkward-looking aspect of the fireplace in the corner, in my perspective, is, well, the corner. When the walls above the fireplace meet in the corner, it produces a large, empty, triangular area that is difficult to make appear appealing.
Visit Here: constructionscope
We’ve utilized imitation brick paneling in our basement before. We just can’t seem to stop ourselves. Previously, we utilized Ed’s approach for hiding seams in brick paneling and also painted it. We wanted a brick imitation fireplace but didn’t want to repeat the process.
How to make a corner fireplace at home:
Step 1: construct the electric fireplace insert box
Make sure you have a strong foundation — that is the only section that will hold any weight.
We cut a piece of raw stock, 1′′ wood we had leftover from a prior job slightly bigger than the electric insert we bought.
Our firebox’s sides/rest are practically a movie set — a lightweight frame covered with our favorite imitation brick panel. I tilted it up towards the rear to give the impression that it was ascending a chimney rather than a level ceiling. Magical stagecraft!
This is the finished firebox. Before we cut a single board, we set it up on various items to evaluate possible heights and depths for the entire fireplace. Strongly recommended!
If You Need More Information’s check This Link: 123musiq
Step 2: Construct the faux fireplace base
We made this foundation out of 2′′x6′′ frame timber after deciding on a position, depth, and height (which meant laying out the entire thing with masking tape to see it all in 3D).
Because the firebox foundation was strong enough to support the insert, we just required enough construction to keep the box in place. Set up the Firebox. This entailed screwing it in a couple of places. Screwheads will be buried afterward with drywall compound, so don’t be concerned about being unsightly.
Step 3: Construct the fake fireplace surround
The face frames the surrounding area. We utilized 2′′x4′′ for the sides and 2′′x6′′ for the top to offer the mantle a variety of places to attach. I forgot to photograph all of the ‘well constructed’ supports I installed behind the firebox. There wasn’t much; I just used some 2′′x4′′ to attach the actual walls to the face and give it strength.
Step 4: Screw the faux brick to the fireplace.
This is when things start to get a bit tricky. Examine the bricks in the firebox and align the mortar lines with the brick panel you’re putting to the face. I had to re-cut numerous times to get the lines to match up.
Step 5: Apply faux bricks.
We’ve done a similar method on imitation brick paneling before, but this one required a few new abilities — start with this instruction first, with a few changes:
First, you’ll want to cover a much larger area of the panel than you would if you were merely covering seams. We discovered that only a few fragments of red brick peeping through are enough to create the look. You’ll also need to sand it a little to remove the odd compound peak. After sanding, wipe it off with a moist cloth to finish — no painting necessary!
Second, I applied a thick coat of drywall compound to both the firebox foundation and the mantle ‘baseboard’ to give the impression that they were solid cement. Because you don’t need to get anything smooth, it was a lot easier than ordinary drywall.
6. Construct the faux reclaimed wood mantle
Each mantle will be unique in terms of size. We discovered that 1′′x8′′ pine was the ideal size. I cut the corner angles for the top and tested them in place before mitering the front edge corners to cover the seam as much as possible.
Regularly test it in place and double-check everything before joining the two portions. I’m not going to sugarcoat it: entering the miter was a major hardship. Trying to get everything to match up and glue and shoot a couple of nails. so many curses.
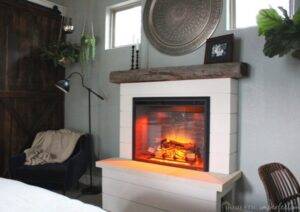
If you’re having problems, consider attaching them in two sections to your surround and completing them in place. It will cause your house to smell like wood stain/finish, but it may save your sanity. On the schmeared fireplace, the mantle is in place. It’s starting to appear real. When the mantle is in place, stain/finish it in your preferred manner. Of course, we treated it with our standard handmade reclaimed wood stain — the same stain we used for our DIY media cabinet top – so it fits right in.
Step 7: Cover the corner fireplace frame
Another scumbag blogger! I constructed (but did not picture!) a tiny wall and attached it to the top of the fireplace, inset from where the mantle would be.
Many corner fireplaces lack this feature, but we believe it adds realism by making it appear as though an actual chimney is behind it. It was constructed from 2′′x4′′ and drywalled with leftover blueboard since I had leftover blueboard.
Step 8: Install vertical shiplap on top of the wall.
Vertical shiplap is an excellent way to provide the appearance of height to a basement (or any space).
To add interest above the mantle and alongside our artificial fireplace, we used our vertical shiplap method. It also complements the hollow core door renovation we completed just next to it! them.


